Search

eLearning Frenzy

eLearning is like a sewer, what you get out of it depends on what you put into it.

Category

Best Practices

#bestpracticemonday – The Importance of Rubrics in Blackboard Courses

Rbrics CubeThis blog has covered the importance of communication strategies when leading an online course. Students who feel like they have effective lines of communication during an online course tend to have a higher opinion of the course’s quality. Part of effective communication lies in the explanation of  assessment and evaluation of student work. The Blackboard learning management system has a tool that can assist faculty when communicating around grading and assessment. This tool is called the Blackboard Rubric.

Rubric (Definition)
A rubric is a way to communicate expectations of quality about an assignment or activity.

The Blackboard Rubric is an assessment tool that lists evaluation criteria for an assignment, and provides a means to convey to students your expectations for the quality of completed assignments.  This tool is an effective means to enhance an online instructor’s communication strategy.  The Blackboard Rubric tool is important for three reasons.

  1. Using a Blackboard Rubric Clears up any Grading Ambiguity for Students
  2. Using a Blackboard Rubric Makes Grading Easier and Consistent
  3. Using a Blackboard Rubric Lets Students Know What they Need to Succeed

Using a Blackboard Rubric Clears up any Grading Ambiguity for Students

Students in online courses can feel like they have multiple reasons to be anxious about their experience.  Technology glitches, digital proficiencies, and communication snafus are all obstacles that can present a problem for online students.    This does not even take into account how students interpret results from assignments and activities they have turned in.  In a face-to-face environment, students have the luxury of talking to the professor during class or stopping by the office to talk about their grade. Online students who want to know why they received the grade they did have to jump through hoops at times to determine where they went wrong.  For a student, just seeing a number in their My Grades area of Blackboard doesn’t give them the full picture.

Rubric Criterion with Feedback Box
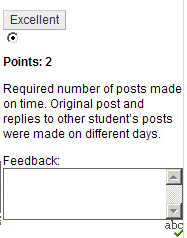
The Blackboard Rubric tool provides an easy method for communicating about student performance. How a student performed is not only detailed by the indicated criterion and level of achievement, but the instructor has the ability to provide further individual feedback at the individual criterion level.    If one specific criterion has three levels of possible achievement, then Blackboard instructor will have the ability to leave feedback right where the student landed for their assignment/activity.

Giving students the tools to understand how they performed, will equip them with the ability to not only understand why they performed the way they did, it can also enable them to improve upon their performance.

Using a Blackboard Rubric Makes Grading Easier and Consistent

Grading assignments/activities in Blackboard can take a fair amount of an online instructor’s time.  One way to simplify the process and give both the instructor and the students a detailed explanation of the evaluation is to grade with the Rubric Tool.  Blackboard Rubrics can be associated with:

  • Assignments
  • Essay, Short Answer and File Response test questions
  • Blogs and Journals
  • Wikis
  • Discussion board forums and threads

This means that each of these activities can be graded using the Rubric tool.   Once a rubric is associated with a Blackboard activity, the instructor can access the gradable item via the Grade Center, on the Needs Grading page, or directly from the tool.  Once in the in-line grading or grading view the View Rubric (button or link) is clicked and the instructor can select the level of achievement for each criterion and the points are automatically tabulated!

Using a Blackboard Rubric Lets Students Know What they Needs to Succeed

SuccessIf a student knows what it takes to succeed at a particular assignment, they are far more likely to be successful themselves.  The Blackboard Rubric tool has the ability to allow the students to see the Rubric BEFORE they complete the assignment.

When viewing a Blackboard activity a link is provided to your students to View the Rubric.  They then see the activity levels of achievement and criterion.  The rubric gives them visibility into what it takes to not meet requirements, meet the requirements, and exceed the requirements for the activity. The rubric then becomes the book-ends for the assignment:  a guide for what they need to be successful and a tool for letting them know how they performed.

At the very least, the use of Blackboard Rubrics can help students organize their efforts to meet the requirements of an assignment, and you can use them to explain evaluations to students. Rubrics can help ensure consistent and impartial grading.  They are important because they clear up grading ambiguity, make grading easier, and provide a pathway to success.

For more on the Blackboard Rubric tool, check out the Blackboard Help pages.

Where to Start – Example Rubrics

Use Smart Views to corral unruly group assignments in the Blackboard Grade Center.

Leveraging course groups, as part of a course plan is one of the most important things an online instructor can do to encourage student engagement in an online course.

Course GroupsBenefits of course groups include:

  • Ready-made collaboration activities
  • Activities are usually recorded (discussions, blogs, wikis)
  • Critical thinking encouraged with peer review of group work
  • Students become content creators

While group activities are beneficial to students, they can create extra work for you when it comes to grading.  Thankfully, Blackboard has a handy tool in the grade center to cut down on the multiple columns you have to sort through when trying to grade group work.  To manage the amount of columns and list only the groups or a specific group, just employ a Smart View.

A Smart View is a focused look at the Grade Center. It shows only the columns that match a set of criteria, and the view is saved for continued use. When the Grade Center includes a great number of students and columns, you can use smart views to quickly find data.

Several smart views are available by default, but you can also create your own. You can easily move between the Full Grade Center view and any of the available smart views. You can set a smart view as the default view of the Grade Center and change it at any time.

Smart View Selection CriteriaWith smart views, you can view the progress of the following:

  • An existing group
  • Student performance for a particular item
  • Individual students
  • Category and status of items
  • Custom combination of attributes

The Smart View list can be accessed via the manage button in the grade center.   The Smart Views can be added to the Favorites that already show up in the grade center menu of your control panel (includes assignments, tests by default).  They can also be created from this page.

*Note:  You will need to create course groups before you can create a group-based Smart View.

The Smart Views will let you focus on exactly what you want and nothing you don’t.  Be careful though, once you start using Blackboard’s Smart Views in the grade center for groups, you’ll find yourself using them on other things like tracking low scores for students who need help or to compare two different types of assessments for starters.

#bestpracticemonday – How to Choose Technology-Based Tools for an Online Course

Teaching online can seem like wading through a super store of technological innovation when it comes to the amount of technological aids available. There are a bevy of tools that can brought to bear when enhancing and equipping student learning.  The challenge comes in deciding which of these tools to use when putting together a course plan.  It is very easy to be mesmerized by the shiny object with all the bells and whistles when browing through available tech tools. The instructor is immediately assailed with questions.  Which tool works best? Which tool will the students like?  Is it too new?  Is it too old?

Making ChoicesWhen picking technologies to use in an online course, keep these four things in mind:

  1. Learning Objectives
  2. Know The Audience
  3. Logistical Considerations
  4. Instructor Comfort Level

Learning Objectives

Learning ObjectivesOnline instructors seem to have more options than ever when it comes to technology choices for their courses.  Personal Learning Networks (PLNs) are inundated by technology products that claim to work with big ideas and catchy concepts like gamification of learning and the ability to disrupt the status quo.  The pressure of keeping up with the Dr. Joneses alone can make a teacher’s technology tool belt feel more like a burden than an aid.

It is during this maelstrom of keywords and catchphrases that it is important to ask if the chosen tool will assist in completing learning objectives.  Hold firm to the mantra that it’s the method, not the medium. If the tool assists in completing learning objectives, then it is the right tool for the job.

Know The Audience

Know the AudienceWalking into a situation already knowing how the audience will react is a tremendous benefit for anyone and even more so for an online instructor.  Knowing the student audience in an online course greatly influences the technology choices that are made.

Knowing the audience isn’t some innate psychic power that online instructors are born with.  Some of this knowledge comes from past teaching experience and some comes from working through activities as a course progresses.  One of the best ways to know the audience of an online course is to take a technology literacy survey early on in the course.  This helps to establish a basic comfort level for participants and helps the instructor know which tools fill a learning need without raising anxiety levels.

Logistical Considerations

Logistical ConsiderationsChoosing the right technology can be seriously impacted by logistical considerations.  These considerations can be student-centric like a lack of high-speed Internet or a total lack of technology all together at certain periods of time.  Military service members in particular may have stretches of time where they do not have access to high-def technology, so scheduling a web conference may not be a good idea.

There is another side of logistics that must also be thought about.  The support structure for online instructors is a huge logistical consideration when choosing technology.    If a technology in use by instructors and students stops working during the course of a term, who is responsible for fixing it?  If students need help getting the technology to work, is there a support number, web or e-mail address that they can use? Do the online instructor and students have access to a help desk?  Do the help desk hours coincide with times that the technology will be used? All of these logistical considerations need to be taken into account when picking technology to use in an online course.

Instructor Comfort Level

This last part was almost not included in that it should be an understood value when it comes to tech tool selection.  The online instructor needs to be comfortable with the technology tools they choose.  It does the online students no good if the instructor’s anxiety level is up.  Students take their behavioral queues from the teacher.  If the instructor seems like they have a firm grasp of the technology and can calmly relate appropriate usage, then the student will feel the same way.  Conversely, if the instructor is flustered and communicates stress when trying to use the tool, the students will reflect that stress and frustration right back.

Comfort with technology is gained by practice.  Before introducing a tool to students, the online instructor should work with the tool on and off line to ensure that it works and that he or she is familiar with all of the technological “bumps in the road” that may arise.   Where possible the instructor should use the tool in a current class where the students can passively view the results before trying it themselves.  For example, he or she can use a presentation software like Prezi for lecture materials BEFORE asking the students to create a presentation of their own.

Choosing Technology

These 4 items can be of assistance when deciding which technologies to use. Working through them will save time and frustration before the online course begins.

Remember, the technologies out there might seem like the greatest thing since sliced bread, but if they don’t help meet learning objectives, if the audience isn’t taken into account, if logistical considerations aren’t thought about and if the instructor isn’t comfortable with the technologies then they are much like the bard wrote, “full of sound and fury and signifying nothing”.

The Secret to Student Success in Your Online Course

Hidden TreasureSo, you want to know how to help facilitate student success in your online courses huh?  The good news is that it isn’t like the search for the holy grail or an Indiana Jones-like adventure to find a hidden treasure. It is simply a matter of systemically and uniformly taking certain steps when deploying course activities/assignments throughout your course.

So take comfort in the knowledge that their are no rooms full of snakes or other dangers involved.  The secret to student success in your online course revolves around these three things being given with each graded activity:

  1. Provide Assignment Instructions (Context)
  2. Provide Technical Instructions (How to use assignment/activity/submission tool)
  3. Demonstrate what success will look like for the particular assignment/activity (Rubric)

 
PROVIDE ASSIGNMENT INSTRUCTIONS

InstructionsThis one seems like a no-brainer, right?  We all provide assignment instructions don’t we?  At first glance you might think that you have this taken care of because you put all of your assignment instructions in your syllabus.  However, we know that a student who is in the middle of a unit in your online course looks for the instructions to be chunked along with the course activities.   So to give context to your students; to let them know why they where they are and what they need to be doing there, place instructions at the unit and individual assignment/activity level.

Whether you are deploying a discussion board, a electronic submission assignment or a collaborate wiki, providing contextual instruction for what the activity is the first step in steering your students toward success.

PROVIDE TECHNICAL INSTRUCTIONS

how-to-logoAs has been stated before in this blog, your students may be living in a digital age, but that does not mean that they are all digital natives.  Keeping that in mind, it is never wise to assume that they already know how to use every tool you will employ in your online course.  This is the case when dealing with clicking on a link so a folder will open, replying to a post in a discussion forum, or creating a blog post for a reflection assignment.

To ease student anxiety and cut down on late night e-mails or phone call to the helpdesk, place technical instructions for how to use the activity tool directly inside the assignment or activity.  This would be for example, letting students know how to create discussion board posts and how to reply to them as part of the instructions for the activity.

DEMONSTRATE WHAT SUCCESS LOOKS LIKE

Success If a student knows what it takes to succeed at a particular assignment, they are far more likely to be successful themselves. You can give your students this path to success with a few easy keystrokes.  This could be something as simple as you demonstrating a successful discussion post in an introductory discussion forum, or you providing a good example of APA formatting for citations in a paper.  One of the best ways for you to demonstrate what success looks like is to use a rubric.

Merriam-Webster describe a rubric as:

a guide listing specific criteria for grading or scoring academic papers, projects, or tests

Using a Rubric tool or providing a Rubric document along with assignments and activities lets the student know what kinds of steps they need to take to be successful in completion of that particular activity.  It also provides the added benefit of communicating to students how they did or did not measure up to the expectations of the assignment after it is graded.

These three steps when applied systematically and uniformly throughout an online course can be the difference between success and failure for an online student.  These concepts are not really that new or paradigm shifting in that teachers have been doing these things for years, but leveraging them together will be putting another tool in your teaching tool belt that helps you equip your students to succeed in their online courses.

How Teaching An Online Course is Like Running a Marathon

Jacob Finishing his First MarathonAdmittedly, the body of this post may or may not be heavily influenced by the fact that I just completed my first marathon, but I do believe that the comparison is a sound one.   No, running 26.2 miles hasn’t boiled my brains.  While training for this event I started thinking about these two as parallels and after finishing my run, I’m even more convinced.

So before I spend more time rejoicing in my accomplishment and/or my soreness here are the comparisons:

1.  Running A Marathon or Teaching an Online Course Requires Preparation

I didn’t just wake up Saturday morning and decide that I wanted to run a marathon that day.  Months ago, I began a scheduled series of runs to prepare me for the event.  My legs weren’t ready for a marathon back in April when I decided I wanted to this.  Three and a half months of preparation went into making sure I could complete my long distance run.

Successful online instructors begin planning for their online courses long before uploading the syllabus or posting their first announcement.   They start aligning curriculum to objectives before the first day of class.  They decide on a course plan, technologies and strategies for assessment, communication and collaboration if they are redesigning their own course, or they work with a colleague or instructional designer if they are teaching online for the first time or using canned content.

Start Slow2. Whether Teaching Online or Running a Marathon – Start Slow

Running 26.2 miles takes a lot out of you.  Beginning slowly helps you store up energy for when you need and it starts warming your body up for the long road ahead.  Usually you are in a crowd of people and confusion erupts if you start tripping over your own feet or someone else’s when trying to get out with a fast start.  Finally you just want to slowly adjust your body to the rigor of a marathon.

A measured start to an online course is also important for instructors.  Whether you are teaching for 4 weeks or 4 months a slow start benefits you and your students.  First, you cut down on the confusion and anxiety that can be experienced at the outset by helping your student to get their feet wet with some introductory activities.  Take the time let the students get to know each other and the course environment.  It may take a day or two or week depending on the length of the term, but it pays off in the end.

3.  In Online Courses just like Marathons – There WILL be Problems

Obstacles - Snake in RoadSo, on August 3rd I didn’t set out to have problems when I began my run.  It was 6 in the morning; temperature in the low 80s and a light breeze was blowing.  All in all, it looked like a good day for a run.  However, before I finished my race I ran into some issues.  A little over halfway through the race my feet started to develop blisters.   Let me tell you, there is nothing more fun than running on blisters. I had done enough research to know that this could happen and just put up with the pain knowing that I would finish and be able to get off of my feet.  However, a very unexpected obstacle was thrown in my path about ¾ of the way through the event.  I was on my way back during my 3rd circuit and saw a 6-foot long King snake slither across the trail.  I immediately stopped and warned the folks behind me that we had a cold-blooded obstacle in our path.  We didn’t have an immediate way to deal with the snake, so we just waited patiently for it to cross the trail and went on our way.

There is an old adage when it comes to working with technology.  It goes: “It is not a matter of IF technology will fail, it is a matter of WHEN technology will fail.” Online courses by their very nature are technology-rich environments.  Students (and you) use multiple types of technology to view, communicate and interact with course materials and each other.

Just like in a race obstacles can get in the way of you and your students participating in your online course.   You will experience issues that you are familiar with.  These issues revolve around things like power outages, Internet blips, browser issues and a few others.  They have happened before and you generally know how to deal with them.  Sometimes you will come across the unaccounted for “snake in your path” when teaching an online course.  When you encounter these issues, the most important thing to do is to keep the lines of communication open.  Let your students know that you know there is a problem.  Reassure them that it will pass and that things will continue once it is cleared up.  Reaching out to your students lowers anxiety and lets them know that you understand what they are going through.

Finish Strong4.  In a Long Distance Race or an Online Course – Finish Strong

When doing my last mile, I reminded myself of all the hard work I put into my training.  The hours of time I spent running, the different distances, the regularly scheduled workouts I committed to each week and the mental endurance to stay focused all came to a head in that mile as I kicked through to the finish.

Wrapping up an online course should pull everything together for your students.  They should be able to connect the dots of their learning and see the big picture of what they got out of their online course. You and they should feel a sense of accomplishment in finishing the course.

Participating in a marathon and teaching an online course are both “long distance” activities.  They both require a commitment of time, effort and energy from the participant.    If you prepare for your course before starting it, allow for an orientation period or “slow start”, be ready for obstacles and communicate through them and finish strong by connecting the dots for your students you will come out ahead with a “finished race” and a “good time”.

Looking for a 1st week of class activity? Introduce your students to Blackboard’s Social Learning tools.

One of the most important things your students can do while they pursue their education is to begin to build their PLN or Personal/Professional Learning Network.

A personal learning network is an informal learning network that consists of the people a learner interacts with and derives knowledge from in a personal learning environment. In a PLN, a person makes a connection with another person with the specific intent that some type of learning will occur because of that connection.

Linked-in, Twitter feeds, professional user groups, blogs and connections your students make to colleagues are all examples of ways students can extend their PLN.  Blackboard now offers a way students can begin this experience with the new Social Learning Tools.

With Blackboard’s social learning tools you can:

  • Have an enhanced Profile where you create your online academic identity and share only what you want to share. Profiles include a profile wall for communication and the ability to message and follow other users to make connections and build your learning network.
  • Use the People tool to find your students and peers, at your school or at another school with Blackboard Learn, and build your global learning network.
  • Message anyone within the global learning network.
  • Create a collaboration Space that you control, where you can communicate with others for departmental collaboration, best practice sharing, committee work, or to foster social learning among your students. You can also participate in spaces created by your peers or students.

Why the First Week?

  • Familiarizes the student with the My Blackboard menu which gives them access to their social profile as well as the dashboard for what’s going on in all of their courses.
  • Provides a way for student to identify themselves via photo and professional, educational and social information.  Once student has uploaded a photo, every interaction they make in your course will display their photo along side it so you and fellow students can connect with each other.
  • Let’s the students know that you are interested in them as more than just a person taking a class, which can start their learning journey out on the right foot.
  • Greases the wheels of communication:  Prompts the students to start collaborating/interacting from the start.

You can find instructions for using these tools in the Teaching Online tab in Blackboard and your students can find instructions through the Getting Started tab.  Both sets of instructions are accessed by using the Get Connected link in their respective course’s navigation menu.  You can also find instructions on the web here at help.blackboard.com.

Three Ways to Ensure Student Success when Teaching Online

Student SuccessInstructors who teach online must cover a number of bases when working with students in an online environment.   You must be mentors, knowledge sharers, tech support, facilitators of learning, and technology gurus in your own right.    It is easy to see that trying to wear all of these hats can make an online instructor’s life difficult and that student success becomes an afterthought to just surviving an online course.

The good news is that there are ways to ensure your students have a successful learning journey.  There are methods, best practices, tips & tricks that can make your life and the lives of your students easier when participating in an online course.  For this blog, we will focus on three:

  1. Start Here
  2. Model the Behavior You Want to See
  3. Contextualize Your Instruction

Start HEreStart Here

We often assume that students that come into our online courses are digital natives and will somehow intrinsically know how to find their way around when they first enter an online course.  Aside from the fact that not every student born after 1990 has a computer implanted in their brain, more and more students pursing an online education are non-traditional students and may not feel as comfortable in the online environment.

This is why it is a good idea to use a Start Here unit or content area in your course.  You can leverage the unit as a kind of “this is how my course works” walk-through for your students.  It should contain things like course expectations, a welcome message or video from you, introductory discussion and any other information that can help your students be successful in your course.  Tips like “assignments, discussions and quizzes are located in each course unit (Weeks)” can answer questions before they are even asked.

Giving your students a “standard operating procedure” for how your course will work will go a long way toward reducing their anxieties about your course and put them on a path for success.

Model the Behavior You Want to See

One way that parents impart knowledge to their young is to demonstrate whatever it is they would like their progeny to do.  When you teach, adopt the same practice in order to ensure that your students know what is expected of them.  Giving the students a guide or working rubric for what is acceptable can go a long way toward ensuring student success.  If you are having them turn in papers, give them a non-topic specific example of how you’d like their papers formatted.  It doesn’t have to be an entire paper, but an example of what you are looking for from them.  When using the Learning Management System’s discussion board for the first time in your class, be the first person take make the post.  This works best in an “Introductions” discussion. Provide the instruction and then provide the example that follows that instruction.  The same thing goes for blogs, wikis and journals.

Giving your students an example of the online course behaviors will reduce the amount of uncertainty that naturally comes when taking an online course.  Remember that some of them may never have submitted an assignment online or participated in an online discussion.  Taking the extra time early in your course to provide guidance will help your students feel at ease and let them know that you are engaged in the course along with them.

Contextualize Your Instruction

Contextual InstructionThink of your online course as a new destination for your students on their learning journey.  How would they describe their navigation experience?  Would they say that once they travel into your course that it is difficult to find their way back?  Would they say that the course links were easy to find and use?  Would they be frustrated trying to make it to their “destination”?  These questions can be easily put to rest by providing contextual instruction wherever your students are within the course. If you put every bit of instruction your students would need for the course within the syllabus you would end up with the document that rivals to War and Peace in its width and breadth.   Compare how hard it would be to locate instruction in a 20 page document versus instruction in the same area where your students are currently working.  College students are used to living in a connected world where they can find instructions for how to do something right where they are via their mobile device or computer. Taking the extra time to provide instruction in the context of where the students are in your course is easy.  Here are a few examples:

  • Place unit level or assignment specific ojbectives throughout your course. Traditionally we have left Learning Objectives in the syllabus and forgotten about them.  By placing objectives in the unit where the student is working or on the assignment the student is focusing on, you remind the students why they are doing what they are doing, and connect the students to course content in a way that keeps them focused on the topic at hand.
  • Create a locked INSTRUCTIONS thread in each discussion. Not all LMSs have the facility to keep the forum instructions/description where posts and replies are made.  Make the first post of the discussion be a locked INSTRUCTIONS thread that students cannot reply to but is available for them to ensure they remember what they need to do in the forum.
  • When placing content in folders, units, learning modules & containers, be descriptive.  When creating a folder to place a unit’s worth of course materials, be sure to provide a description to students of what is in the folder. Remember that old adage “Tell them what you are going to tell them“.  Placing descriptions on each content folder, unit or module leaves the students with no question as to what those items contain and reduces the stress of not knowing where to click.
  • Provide “signs” that tell the students where to go and what to do.  This last point on contextualizing your instruction may seem like it comes straight out of the Department of Double Redundancy Department, but it is well worth it to ensure that there is no confusion on the part of your online students.  Online students don’t always know where to go or what to click on to advance in your course.  A great best practice is to provide the contextual instruction for students so that they will successfully navigate your course.  When you do use a folder, or unit for organization be sure to tell them to click the title when you type up your folder/unit description.  Also, with some LMSs you can change the title of this particular container/item to blue.  Blue is the universal color of links and will help draw the student’s eye. Lastly, place an item at the end of your unit telling the students where to go next.  Don’t assume that they always know what comes next in your online course. Provide them with a signpost that points the way!

As with all strategies for success, don’t feel you need to implement all of these at once.  You can use them all, but don’t feel like you have to.  Pick one of them to use this time and become comfortable with it.  Next time add another and so on.  We all want to be in the business of student success.  We want to see our students succeed.  With a little extra effort you can help ensure that students fewer obstacles in their path when it comes to being successful in your online course.  Implementing a Start Here unit in your course, modeling the behavior  you want your students to exhibit and contextualizing your instructions will help set you and your students on a path to success.

BbWorld – Last Keynote: Sugata Mitra

Sugata Mitra is Professor of Educational Technology at the School of Education, Communication and Language Sciences at Newcastle University, England. He is best known for his “Hole in the Wall” experiment, and widely cited in works on literacy and education. He is Chief Scientist, Emeritus, at NIIT. He is also the winner of the TED Prize 2013.

Mitra has been described as a polymath by the University of London, as his 30 years of research spans a wide range of disciplines.

Sugata Mitra, put computers in “a hole in a wall” in the slums of India.  His book Beyond the hole in the wall covers what happened afterwards.

Talk should be filed under self-education:

Why is it the way it is right now?  With Helicopter you tell children “do not touch it” wait until someone tells you what you have to do….that is the education system we have to day.  From an age when you can press a button and blow things up….but a computer is not like that.

How can teachers change when they are driven by an ancient examination system that they have to teach to? System was engineered for the 19th Century.

14 years ago Sugata Mitra put a computer in a slum in India. He used to make courses for people who had money.  Who has decided that slum children won’t make good programmers?  From this frustration he put the computer in the wall.  The students taught themselves and each other!

Students taught themselves English in order to use the computer he left there.  8 year olds were teaching 6 year olds how to work the computer.

Girls between 11-13 invent a system of adminitration to give everyone access to the machine.

English Language gets better.  Get bored of the games on the machine, find new games and discover google and EVERYTHING changes.

Children discuss what else they can do with the computer and how the community can maintain the computer so that it never goes away and never breaks down (that doesn’t happen – big challenge for technology durable computer for rough environments)

Speech to text software helps students improve their speaking skills. Students download the speaking Oxford dictionary to check against for Speech to text.  They invented the pedagogy!

Student start to learn BECAUSE I’m not there!  Students were completing educational objectives by themsleves.

One student makes a small breakthrough and then reflects to the rest of the students!

Students can reproduce individually w/out help what they did as a group with aids months later.

These ideas are being applied to schools in UK.  Get a group of children, ask them to make groups of four (allowed to use 1 computer with an internet connection)  Give them one question to solve. (Bringing the properties of Hole in the wall into the classroom)

Children will go to almost any length to find the answers.

Self-Organized Learning Environments – Hole in the Wall learning method. Self Organized learning environments need a boost….the admiration boost (grandmother effect – positive affirmation)  The Granny Cloud

Schools in the Cloud!


BbWorld Session: Incorporating Student-Centered Activities within Blackboard Learn Courses

Session Title: Incorporating Student-Centered Activities within Blackboard Learn Courses
Thursday, July 11 9:25 – 9:50
Venetian|Palazzo Congress Center, Bellini 2003

Erika Wilkinson
Dean of Online & Continuing Education
Central Penn College

Being student centered must spill into every aspect of university life.

The Approach:

Start with Literature Review, Get Buy-in, Highlight non-student centered policies and develop professional development sessions.

Definitions & Review of Activities  (wikis to discuss class policies, journals for refleciton and dbs for collabo)

Instructor Centered vs. Student Centered

Don’t just stand there and share your expertise.  Involve the students, be collaborative.  Its about how you engage with your students.

Things (Topics that can be discussed)  Give Students options, get student buy-in and opinion on what they want to look into.

People (How you view it) – How you engage with students is important

Process (How the Information is shared)  Same thing every week (PPT, Discussion, Assignment)Have students post lecture notes (outline) by group.  Include your students!

Teaching is now how many posts are in DB or if curriculum is uploaded.  Teaching is how you are engaging your students!

Class Policies – Provide opportunity for students to take ownership of course requirements – Use Wiki with students to determine class policies:  Allow Student Editing, Allow Student Commenting, Decide if participation is graded.  “Class are we going to allow late work?”  “Should there be a penalty”?  “Should Extra Credit be available?” Post rationale.

REFLECTION – Provides opportunity for students to engage in learning. Bb Tool:  Journal – Weekly or Monthly entries, allow users to edit or delete, permit course users to view journal (Private vs. public), graded journal.

Journal Activity – Reflect on your personal goals for the class as they align with the course objective.  By the end of each week post a reflection on how this weeks assignments aligned with your goals and any modifications you anticipate in behavior for upcoming assignments.

Collaborate – encourage students and teachers to learn from one another. Bb tool: DB, WIKI, COLLAB SESSIONS.  Have students work together on review assignments for upcoming exams or presentations.

DB example – Give students roles in managing their own discussion

Takaways:

Begin on small scale, communicate new approach with students, use Bb tools to:

  • engage students in their learning
  • encourage students to reflect on their learning
  • motivate students by empowering them
  • Encourage students and faculty to learn from one another

Blog at WordPress.com.

Up ↑