A few weeks back, I did a post about an elearning best practice that turned into a song. Well that song has finally been turned into a music video. If this doesn’t help you to remember to check the links and embeds to external content in your online course, I don’t know what will!
 An online instructor has many “friends” or tools to help facilitate communication, assessment, collaboration and learning in their online course. In many instances a faculty will chose one tool over the other for obvious reasons. A course blog can cover a number of bases and it is a medium that many of your students will already be familiar for helping to digest information. This blog post (<– see what I did there) will cover just a few ways that a course blog can benefit you and your students.
 A Blog Can Keep Your Students Informed and Engaged
It is already a best practice for you to communicate regularly with your students. A blog can help facilitate that practice by helping you to post weekly (or more depending upon your need). Ensure your students have a expectation of having to check the blog regularly and can expect (from you) a post each week.
Part of what you are trying to do here is remind your students of upcoming assignments, readings, or research as well as giving them waypoints or signposts where they should be paying attention.
 Use the Blog for Feedback
One of the best ways to utilize your course blog is to make it a feedback mechanism. Letting your students know that you are reading their assignment submissions, discussions and other assessments assures them that you are taking an active part on their learning journey. For example, use the blog post to sum up student discussion posts or submitted papers for the week giving kudos (by name) to students who are really bringing it home and challenges where the class maybe coming up a little short. You can turn the feedback around and have them comment on a blog post to collect feedback.
 The Course Blog Makes Finding Information Easy
Have a course blog means that your students will know where to go to find the out what’s happening in your course. They know that they can use the tool to search for the data they want.
Digging through a syllabus or checking old announcements can be time consuming for some students. The course blog provides a familiar interface that is easy to search for needed information. In many instances, students can search by category, key word or date (week, month etc..). The blog keeps an archive of old posts so your students will know exactly where to look.

Keeping your students informed, engaged and in the loop is key to ensure they have a successful leg in their educational journey. The course blog allows you to let your students know what’s going on, provide feedback and provides an easy way to find all of that information.
*Blackboard Learn provides the added benefit of associating your picture with each post and your students’ pictures with each comment, thereby making the experience more personal and connecting.
So my #bestpracticemonday for this week had to do with prepping your course for the next semester in that you should always check links and embeds for all external content. Part of my post had the humorous tribute to Mr. Mister’s Broken Wings (one of my personal favorite bands of that era). So the Tweet actually read:
| @jspradlin #bestpracticemonday “Take..these broken links and learn to browse again..” Check links & embeds for external content prior 2 semester start. |
 After posting that tweet, I received numerous requests to post the rest of the song. As luck would have it I rounded up the members of my 80’s eLearning cover band, “Best Practice” (which was funny as we never really seemed to have time to rehearse) and we (okay it was just me as the rest of the members kept talking about how they missed their swatch watches and parachute pants) put together the Pedagogical sounds of a tribute.
So without further ado, here is Broken Links:
Song: Broken Links
Artist: Best Practice
Label: eLearning Records
Year: 1980 something
Maybe, you’ll understand
why we can just click on the links that we planned.
This time wont’ be the last I fear
cause websites seem to disappear
Where do they go? Ohhh…
Take these broken links
and learn to browse again
learn to surf so free
And when we find the web content
the links will open up again and let us in..
Take these broken links….
Maybe, I think today
we can take that youtube mashup
and make it play.
Or Maybe, it’s all I know, that the Voki I created
Just won’t show
Where did it go?
Take these broken links
and learn to browse again
learn to surf so free
And when we find the web content
the links will open up again and let us in..
Maybe, where can it be, that prezi from last semester
I just can’t see.
yeah yeah yeah, yeah yeah.
Take these broken links
and learn to browse again
learn to surf so free
And when we find the web content
the links will open up again and let us in..
Take these broken links
and learn to browse again
learn to surf so free
And when we find the web content
the links will open up again and let us in..
 In previous posts we have discussed the importance of feedback in your online course. We’ve looked at how students obtain feedback from student/course, student/instructor and student/student interactions. There is however another important type of feedback that can be gathered in your online course(s)…….Student Opinion!
We can all be a little touchy when it comes to something that we have put measurable effort into, but if something is worth your effort, it is also worth you finding ways to improve it. Here are a few suggestions for getting feedback from your students:
Blog – Week in Review
Have your students do a reflective blog post each week that charts the highs, lows and in-betweens of their activity in your online course. Start them off letting them know that you are looking for honest/candid observations of their experience that week.
Trying Something New? – Do a Post assignment Survey
Maybe you are using a wiki for the first time in class, or maybe you are trying out synchronous web meetings. Whatever you are doing, ask your students how it went, how it could be better and what they got out of it.
Three Letter Acronym for Success – KWL
What do you know? What do you want to know? What have you learned? These three questions are key to ensuring that your students know you are listening. By asking the first two questions you can, with the help of your students’ answers, drive learning toward their needs. By asking the last question you can be sure that any objectives you set are met by reading their answers.
Be Formative and Summative
It is nice to find out what your students think when they finish your course, but wouldn’t it be nicer to know if they are really enjoying a certain aspect of your course or have problems with another while they are doing it?
There are other ways to gauge your students’ feelings on your course through discussions, assignments, surveys and synchronous “touching base” online meetings, but hopefully these few can you get started and allow you to improve your course and your students’ online experience.
Possibly the best new thing in Blackboard Learn is the Video Everywhere tool and leverages Youtube so that students can post video in your Blackboard courses. In days of yore, recorded video for students inside a Blackboard course was like searching for that ever elusive Bigfoot in the Adirondacks. Seldom seen and only in the hard to reach (hard to teach) places. Students were relegated to using third party tools and hoping that the embed code they would use worked within the rusty environs of the old text editor.
Now students and faculty can easily present, share and communicate inside blackboard via the Video Everywhere tool. First let me show you a great over view from Blackboard’s own “Quick-Hit” master; Vivek Ramgopal. His videos are a must use resource for faculty and students.
Now we will look at the steps you need to take to record and/or upload a video using the Video Everywhere Tool.
Accessing Video Everywhere
 To access the Video Everywhere feature just click the little webcam button on your content editor. Video Everywhere is available anywhere you use a content editor. You can add video to discussions, blogs, tests/quizzes, wikis, journals and feedback conversations with your instructor via the gradebook.
If nothing happens, be sure you have allowed popups.
Sign In to YouTube
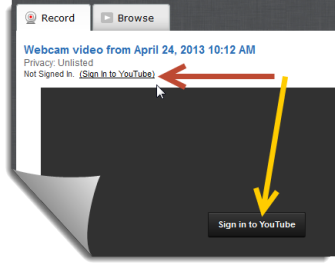 You will need to sign in to leverage your YouTube account to add video to your course. Signing in is as easy as using the Sign in To YouTube link or button.
In most cases this is your Google account, so if you have Gmail or use Google Docs you are already in luck! If you do not have an account you will be prompted to create one.
*Note: If you sign in and notice that you don’t have the ability to press the Record button to capture your image you will need to close your WebCam Recorder window and click the Video Everywhere button  again on your content editor and then select Record.
Recording
Before you record yourself, be sure that you have your webcam/microphone plugged into your computer (if needed).
- Under the Record tab in your Webcam Recorder window click the Record from webcam button.

- Next, you may be prompted to allow Flash to use your Webcam if so, select the Allow & Remember checkboxes, then click Close button.
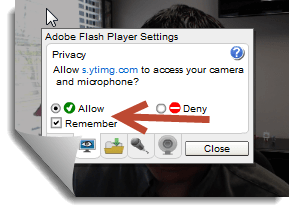
- You are almost ready to start! Be sure that your webcam and mic are working by checking to see if you see yourself and when you talk if the green bar appears on the right. When you are ready, click Start Recording to begin.

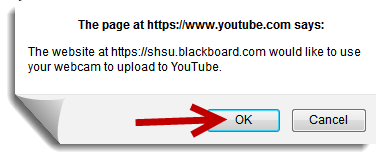
- After you click Start Recording you may be prompted to approve using the tool to upload your video to YouTube. Click OK
- Your Video will begin recording. When you are ready to stop, click the Stop Recording button.

- If you are satisfied with the recording, click Upload otherwise click Start Over and try again.

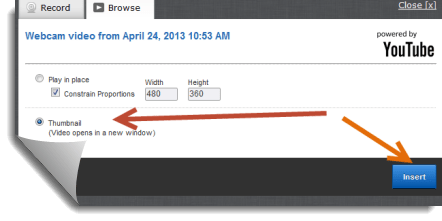
- Next choose whether you would like to embed your video by choosing Play in Place or use Thumbnail to open a separate window to play your video. *Best Practice Alert: Choosing thumbnail will allow thoses people who come in on mobile devices an easier way to view the video. Click Insert to place your video.
- Once you are ready to to complete your assignment, discussion, blog, wiki or conversation press Submit!




Selecting Video from your Video Library
You can also add previously recorded YouTube videos from your Video Library!
- Click the Video Everywhere
 button on content editor and sign in if you haven’t already.
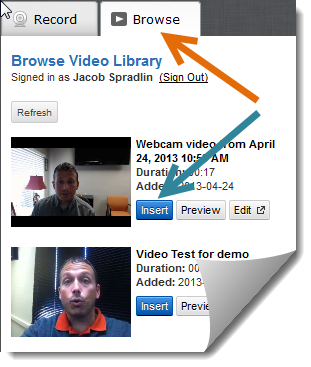
 - Click the Browse tab to access your Video Libary and click the Insert button next to the video you’d like to add to your post.

- Next choose whether you would like to embed your video by choosing Play in Place or use Thumbnail to open a separate window to play your video. *Best Practice Alert: Choosing thumbnail will allow thoses people who come in on mobile devices an easier way to view the video. Click Insert to place your video.

- Once you are ready to to complete your assignment, discussion, blog, wiki or conversation press Submit!
Please accept this ‘Ode To BbWorld 2013’ as my humble submission.
 An Ode to BbWorld 2013

There once was a blogger of eLearning
who had a Technologically specific yearning.
To Vegas he’d go, not just for show,
but for BbWorld VIP Blogger status he was burning.
The Blogger heard that Sugata Mitra would be there,
Mitra’s thoughts on expanding EDU access he’d share.
He would blog them all down, and Tweet them around,
for once, what happened in Vegas wouldn’t stay there.
The knowledge acquired on these five days,
for Tips, Tricks & trends to the mainstays.
They would benefit all, because come the fall,
will be a bevy of BbWorld-influenced #bestpracticemondays!

 Before you give your students access to your course, go through it with Edit Mode off and/or use the Student View button to make sure all your content and tools are accessible and easy to find.
Note: Use your course’s navigation menu because students can’t navigate via the Control Panel.
A few things you should be looking for are:
- When a student enters the course do they know where to go and what to do?
- Are the items in the Nav Menu clear? For instance, ‘Content’ means anything to a new student. It would make more sense to them if it was more specific, like ‘Course Materials’ or ‘Modules’
- Are all the tools you want the students to use linked from the Nav Menu or a Content Area? An easy way to check is by looking at the Nav Menu in Edit View.
- Can all the Tests and Assignments be taken and submitted?
- Do links to other places on the web work? (YouTube videos can be pulled down in a blink of an eye and web content can disappear at any time).
Other things to check while in Edit Mode:
- Links to hidden tests and assignments are not broken. Its good practice to re-deploy all your tests (if you’ve copied the course) to ensure that the links are correctly attached to the Grade Center.
- The Grade Center columns are correctly displayed to students (hidden or revealed) and the weighting and points possible are correct.
- Be sure due dates on items in your course are correct (these can now be changed easily by dragging and dropping with the Calendar feature in My Blackboard.
 When you travel somewhere for the first time, doesn’t it seem to take a little bit longer to get there than it does to return home? Whether it is unfamiliar surroundings, difficulty reading the map or the GPS isn’t up to date, it can be frustratingly slow to travel to new places.
Think of your online course as that new destination for your students. How would they describe their navigation experience? Would they say that once they travel into your course that it is difficult to find their way back? Would they say that the course links were easy to find and use? Would they be frustrated trying to make it to their “destination”?
Connecting your course by organizing and clearly naming your navigation elements will save your students and ultimately you time when putting together your online course.
Below are steps you can take to connect your course and save time for you and your students:
- Use Dividers and Subheaders to visually organize your course’s navigation menu (hint see the Teaching Online and Putting it Together Subheaders in this course.
- Append the text (Click to Open) on titles for content folders, learning modules, lesson plans, web and course links.
- Make the content item Blue if you want your students to click it
- Chunk your course content as you would teach it in your face-to-face course. For example: Put all Chapter content in chapter folder with different sub-folders for each chapter.
- Place a Course Link at the bottom of a unit a study so that the student can navigate back to where they were before easily.

 eLearning Frenzy