Search

eLearning Frenzy

eLearning is like a sewer, what you get out of it depends on what you put into it.

Tag

Blackboard

Help your Students be Reflective with Journals

Merriam Webster defines a journal as:

a book in which you write down your personal experiences and thoughts

Backboard JournalPutting down those thoughts and experiences that impact us can be an important tool in personal growth and development. Journals don’t have to be limited to the “Dear diary” entries you make at your beside table.  They can be used in courses you teach as well. In online courses journals can be used as a mechanism for communication between a faculty member and a student, or as a reflective tool for students as they work to absorb what they are learning.

Benefits of using a journal include but are not limited to:

  • Teaches students to communicate their thoughts on the subject matter
  • Forces students to be on the lookout for journal material (actually paying attention in the course)
  • Helps students to remember what they have learned
  • Keeps a record of ideas, concepts or structures that are important
  • Lets students create without fear of judgement from peers
  • Allows students to take first level thoughts to the next level – idea expansion

Creative writing teachers can benefit from using a journal.  Students can post their entries and instructors can make comments as needed.  Journals can also be used to drive home what the student has studied over the week.  Think about the reinforcement that happens when a student submits an assignment, discusses with his or her peers, takes a quiz and then puts it all together in a journal entry for the week.  Finally, journals are ideally suited for formative assessment.  Get the student’s temperature by asking them to write about their highs and lows as it relates to the course during the week.  If something comes across that is legitimate, feel free to make course corrections for the benefit of all of your students.

Here at SHSU we utilize the Blackboard LearnTM learning management system, which has a journal tool as part of it’s feature set.  Journal assignments can be placed anywhere in the course and are accessible with click of the mouse. Learn more about implementing journals in your Blackboard course.

While you are thinking of ways to ensure your students are getting what they need on their learning journey, consider reflecting on the added value of implementing journal activities to your courses.


Connect your Online Course – Give Students a GPS for Course Content

Connect Your CourseWhen you travel somewhere for the first time, doesn’t it seem to take a little bit longer to get there than it does to return home? Whether it is unfamiliar surroundings, difficulty reading the map or the GPS isn’t up to date, it can be frustratingly slow to travel to new places.

Think of your online course as that new destination for your students. How would they describe their navigation experience? Would they say that once they travel into your course that it is difficult to find their way back? Would they say that the course links were easy to find and use? Would they be frustrated trying to make it to their “destination”?

Even when we try to organize the course so it is organized into more digestible “chunks” for the students, we can make it hard to maneuver. Imagine a student lost in a Escher print of folders within folders within folders.

Connecting your course by organizing, clearly naming your navigation elements and providing an “escape route” will save your students and ultimately you time when putting together your online course.

Below are steps you can take to connect your course and save time for you and your students:

  • Use Dividers and Subheaders to visually organize your course’s navigation menuCourse Menu
  • Append the text (Click the title above to Open) on descriptions for folders, learning modules, lesson plans, web and course links.
    Click to Access text
  • Make the content item Blue if you want your students to click it
  • Chunk your course content as you would teach it in your face-to-face course.  For example: Put all Chapter content in chapter folder with different sub-folders for each chapter.
  • Provide an Escape Route by placing a Course Link at the bottom of a unit of study so that the student can navigate back to where they were before easily.Course Link

Promote Student Engagement by ‘Personalizing’ Your Online Course

Personalized Learning

The Glossary of Education Reform defines student engagement as:

the degree of attention, curiosity, interest, optimism, and passion that students show when they are learning or being taught, which extends to the level of motivation they have to learn and progress in their learning

Personalized LearningIf the above is true, then there are many ways an online instructor can impact the attention, curiosity, interest, optimism, and passion of students.  This particular blog post deals with how personalizing an online course can increase student engagement.  When an online instructor and students can invest more of themselves in on online course, the satisfaction levels reported by those same students will go up.

This particular view of online course personalization will be broken into 5 areas:


Placing Yourself in the Course

Place Yourself in the CoursePrevious posts on this blog have focused on instructor presence in the online course.  We’ve talked about establishing routines to ensure prompt feedback and instructor availability.  This particular practice revolves around something a little more superficial, but important nonetheless.

Students in an online course like to feel that they know who you are.  A text-based introductory paragraph or post in a “getting to know you” discussion forum may not fully encompass who you are to the student.  Why not take one small step and add a picture of yourself to the course.   You may already be familiar with the best practice of establishing a Virtual Office in your course where you can answer student questions.  Why not add your photo and contact information in this same area and personalize your office.

Here at SHSU, Blackboard allows you to set up a Social Profile that places your picture wherever you interact in a course (discussions, blog & wiki posts, grade center etc..). If your students feel like they “know” you, they are more likely to reach out to you and less likely to drift off into obscurity.

The logical next step in this progression is for you to utilize video to connect yourself to your course and your students, but that is a post for another time.


Allowing Students to Place Themselves in the Course

Online StudentsIn online courses it is easy for students to believe that they operate in a vacuum.  They punch their ticket fulfill obligations, and never get a good look at who is on this learning journey with them.  Allowing students to place themselves in your online course begins to build that learning community that encourages students to be successfully engaged.

Why not have your student find a way to place their image in your course.  Have them attach/upload/insert their picture as part of an introductory activity.  Some Learning Management Systems like Blackboard, allow students to create their own Social Profile that includes an image and biography.  After the profile is created the student’s face appears in the course roster, grade center and course activities (blogs, wikis, discussions, group activities etc..).

Having student/faculty images in your online course allows a more cohesive integration of group activity and shared learning.


Allowing Students to Personalize Their Learning

Personalize We know that student satisfaction goes up when they feel like they have some “skin in the game” when it comes to their learning experience.  The challenge for many online instructors is figuring out how to incorporate student content-building or contributions to the online environment.

A good first step is to find out what they know and what they want to know more about.  You as the instructor will define the boundaries from which they will pick, but a survey or KWL* assignment is a great way to start out a course.

*KWL – What do you know?  What do you want to know?  What have you learned?

You can also provide an element of continuous improvement in your courses by having your students journal each week or at an interval of your choosing.  The journal entry could serve 2 purposes:

  1. Provide a graded assignment where the student reflects upon what they learned during the week.
  2. Allow the student to tell you what the high points and low points were of the previous unit of study.

The journaling activity will allow you to make course corrections (pun intended) during the course rather than finding out where you might have some issues when the course is finished and evaluations are in.

There are other methods for involving your students in this process. The scenarios are numerous, but here are a few ideas:

  • Have your students come up with the academic integrity policy for the course to increase buy-in.  They can use a wiki or discussion board to share ideas around defining plagiarism and academic honesty.
  • Create an assignment dealing with constructing a study guide for the final and allow your students to contribute questions.
  • Use peer evaluation as a method for grading discussions and other assignments.


Feedback Early, Feedback Often

FeedbackProbably the most important way to ensure your students believe that you are personally involved in their learning is to provide prompt and frequent feedback.  Think about how you feel when someone gives you kudos on a job well done or even coaching on a subject where you might need assistance.  You feel like someone took a personal interest in something that you were doing, right?  Students feel the same way about the feedback you provide via the course.

Here are some options:

  • Make feedback part of your daily routine as an online instructor
  • Change up how you provide feedback (text/audio/video)
  • Post a weekly announcement recapping the last week’s activities and previewing the current week.
  • Too many students to reply to discussion posts?  Provide 1 summary post per discussion giving kudos and challenges when needed.
  • Schedule “office hours” where you can provide synchronous feedback a ’la chat or webinar when needed.


Personalization without Confusion

Sometimes in our desire to create a learning environment that is personal and engaging for the learner, we can add a layer of confusion that can separate the student from the learning experience we are trying to create.

So before we go tech-crazy or jump into a fun idea feeding frenzy take the following into account:

  • The Main thing is to keep the main thing the main thing.  If the personalization/engagement does not comport to the learning objective, then don’t do it!
  • Keep it simply single. Add one new wrinkle to your experience at a time. Don’t heighten student anxiety by adding lots of tools/tech that they’ve never seen before.
  • Don’t play Hide & Seek with course content and activities.  If you started out putting content and activities in a certain order, stick with it!

Here are some quick and easy ways to provide personalization without confusing the issue:

  • Use images to introduce content/topics and break the monotony of the text monopoly!
  • While keeping the same routine/order of a unit of study, utilize different activities to differentiate the way students interact with the course.
  • Change up how you deliver content to students.  Introduce a discussion activity a ‘la webcam recording or provide an audio introduction with assignment instructions that contain bonus points for those who listen.

These five methods of personalizing the online learning environment don’t have to all be done at once. As with most of the best practices on this blog, we encourage you to take it one step at a time.  Remember if you feel overwhelmed, then odds are your students will too!  Hopefully you will find your students paying more attention, being more curious, showing more interest, bubbling over with optimism and being passionate about their learning.

#bestpracticemonday LMS Skills are Learned Not Inherited – 3 Ways to Help

Blackboard on the BrainI am old enough to remember thinking of computers as something that fit into a large room and young enough to remember when my family received its first computer that sat on a desk in my father’s office. My children are familiar with touch screen interfaces, wireless internet, smartphones and tablets. With all of the technology that students coming into the university setting seem to have at their fingertips it is easy to assume that as digital natives they are already familiar with how a Learning Management System (LMS) works and how to navigate their way through an online class.

One thing I have learned through supporting faculty and facilitating online courses is that you cannot assume that students were born knowing how to maneuver within the confines of a Learning Management System.  LMS skills are learned and not inherited.  Taking this into account there are steps online instructors can take to give students the resources & skills they need to be successful in online courses.

1.  Use a Getting Started Area/Unit to Orient Your Students

Getting StartedHaving the words Getting Started or Start Here show up in your course are automatic clues for your students on where they should go and what they should do.   They immediately give the students a sense of where they should be going and what they should be doing.  Leverage this part of your course to communicate to students about how your course will work.  Explain to students where readings, lectures and videos will be found as well as how they will participate in and submit items for assignments and activities.  Communicate expectations, course policies and general advice in this unit that will help your students be successful. An added bonus here is you can use the Getting Started unit to model how the rest of your units will work.

Instructions2.  Layer Academic and Mechanical Instructions Throughout Your Course

With students, everything revolves around context.  They are becoming used to getting contextual information about the restaurant where they are eating, the traffic they are driving in, and the television shows they are watching.  That is why it is important to not just put instructions in your course syllabus.  They need to placed at the unit and assignment level as well.  A big key here is not just revealing the academic instructions that tell the students the requirements of a particular assignment or activity, but the mechanical instructions that tell the students how to use the particular tool to complete the assignment or activity.

3.  Be Sure Your Students Know How to Get Technical Assistance

Technical SupportIn order to make online courses more interactive and engaging for our students we have added new activities and technologies. We do this to ensure that students have the same types of learning opportunities as students in the face-to-face environment. With any new technology or new tool there will be obstacles, snafus and technical glitches that arise.  It is more important than ever that your students have the resources that can help them work through any of these issues. Post online support desk contact information and hours of operation prominently in your course (At SHSU Online we include a Need Help?  link in every Blackboard course).  If available provide a link to the student documentation for your LMS (The Getting Started with Blackboard Orientation course at SHSU for example).

Even though your students may not know what a LMS is, you can help them by providing the resources and information that can equip them to be successful in your course.  Using a Getting Started area, layering mechanical and academic instructions and connecting your students to tech support are practices you can incorporate to help your students learn how to operate within the Learning Management System.

#bestpracticemonday – 5 Ways to “Engagify” Your Online Course

If you are reading any commentary on online learning these days, you cannot read two sentences without bumping into the phrase student engagementStudent engagement happens when students take an active, purposeful step towards their own learning.  The challenge for online instructors is to find ways to make their courses promote student engagement.  There are many strategies, practices and tools that can help!  Here are 5 ways to engagify your online course:

1. Put yourself in the course.

Put yourself in the courseThis blog has covered the need to personalize the online experience for students.  One great way to promote engagement and get the students to know you is to make sure that “you” are in your course.  This can be done in a number of ways. Uploading a digital photo, providing a Welcome to the Course video, using audio & video to introduce assignments or give feedback and just finding ways to add your personality to the course are just a few examples.

2. Invite students to be the co-pilot on their learning journey.

Student Into CourseIn much the same way you can personalize the course for your students, your students can establish a social presence and take ownership of their learning journey.  They do so by uploading their photo, using audio/video tools and building a network of learning within your online course. They can also be content builders when it comes to providing useful content in the online course with wikis, discussions and other interactive tools.

3. Have your students get “pushy” because there’s an app for that.

Push NotificationsPush notifications are everywhere these days.  In many ways they prompt your students to interact with their work, friends and world around them.  Any major LMS like Blackboard allows students/instructors to enable push notifications to mobile devices to offer reminders about due dates, added content and to interact with each other and the course.

Push notifications are little engagifiers that prompt you and your students to interact with the course and to become engaged with the learning process.

4. Provide academic and technical instructions.

InstructionsWhen you set up your course it is easy to remember to give your students the academic logistics around their course work.  They are provided with assignment length, citation criteria and even word count to help them figure out assignment parameters.  In many cases, a major disconnect develops for students who don’t know how to use the software tool to submit the assignment.  So, remember to provide students with a one or two sentence “how-to” for instructions on uploading or participating in the course activity.  If the activity is complex a link to a full set of instructions may be needed.

5. Broaden your portfolio when it comes to course activities.

Diverse PortfolioImagine having to eat the same meal 3 times a day 5 days a week.  Not very appetizing is it?  Now, take those thoughts and apply them to your course.  Does your weekly activity look suspiciously like reading, discussion, assignment & quiz?  Mashed potatoes again?  Try to liven up your course by adding new/different tools.  Instead of a reflection paper, have your students do a blog posts instead.  Changing up the order of the routine alone can also be a primer for student engagement.

#bestpracticemonday – The Importance of Rubrics in Blackboard Courses

Rbrics CubeThis blog has covered the importance of communication strategies when leading an online course. Students who feel like they have effective lines of communication during an online course tend to have a higher opinion of the course’s quality. Part of effective communication lies in the explanation of  assessment and evaluation of student work. The Blackboard learning management system has a tool that can assist faculty when communicating around grading and assessment. This tool is called the Blackboard Rubric.

Rubric (Definition)
A rubric is a way to communicate expectations of quality about an assignment or activity.

The Blackboard Rubric is an assessment tool that lists evaluation criteria for an assignment, and provides a means to convey to students your expectations for the quality of completed assignments.  This tool is an effective means to enhance an online instructor’s communication strategy.  The Blackboard Rubric tool is important for three reasons.

  1. Using a Blackboard Rubric Clears up any Grading Ambiguity for Students
  2. Using a Blackboard Rubric Makes Grading Easier and Consistent
  3. Using a Blackboard Rubric Lets Students Know What they Need to Succeed

Using a Blackboard Rubric Clears up any Grading Ambiguity for Students

Students in online courses can feel like they have multiple reasons to be anxious about their experience.  Technology glitches, digital proficiencies, and communication snafus are all obstacles that can present a problem for online students.    This does not even take into account how students interpret results from assignments and activities they have turned in.  In a face-to-face environment, students have the luxury of talking to the professor during class or stopping by the office to talk about their grade. Online students who want to know why they received the grade they did have to jump through hoops at times to determine where they went wrong.  For a student, just seeing a number in their My Grades area of Blackboard doesn’t give them the full picture.

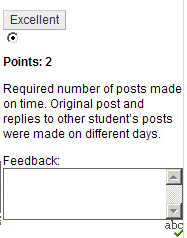
Rubric Criterion with Feedback BoxThe Blackboard Rubric tool provides an easy method for communicating about student performance. How a student performed is not only detailed by the indicated criterion and level of achievement, but the instructor has the ability to provide further individual feedback at the individual criterion level.    If one specific criterion has three levels of possible achievement, then Blackboard instructor will have the ability to leave feedback right where the student landed for their assignment/activity.

Giving students the tools to understand how they performed, will equip them with the ability to not only understand why they performed the way they did, it can also enable them to improve upon their performance.

Using a Blackboard Rubric Makes Grading Easier and Consistent

Grading assignments/activities in Blackboard can take a fair amount of an online instructor’s time.  One way to simplify the process and give both the instructor and the students a detailed explanation of the evaluation is to grade with the Rubric Tool.  Blackboard Rubrics can be associated with:

  • Assignments
  • Essay, Short Answer and File Response test questions
  • Blogs and Journals
  • Wikis
  • Discussion board forums and threads

This means that each of these activities can be graded using the Rubric tool.   Once a rubric is associated with a Blackboard activity, the instructor can access the gradable item via the Grade Center, on the Needs Grading page, or directly from the tool.  Once in the in-line grading or grading view the View Rubric (button or link) is clicked and the instructor can select the level of achievement for each criterion and the points are automatically tabulated!

Using a Blackboard Rubric Lets Students Know What they Needs to Succeed

SuccessIf a student knows what it takes to succeed at a particular assignment, they are far more likely to be successful themselves.  The Blackboard Rubric tool has the ability to allow the students to see the Rubric BEFORE they complete the assignment.

When viewing a Blackboard activity a link is provided to your students to View the Rubric.  They then see the activity levels of achievement and criterion.  The rubric gives them visibility into what it takes to not meet requirements, meet the requirements, and exceed the requirements for the activity. The rubric then becomes the book-ends for the assignment:  a guide for what they need to be successful and a tool for letting them know how they performed.

At the very least, the use of Blackboard Rubrics can help students organize their efforts to meet the requirements of an assignment, and you can use them to explain evaluations to students. Rubrics can help ensure consistent and impartial grading.  They are important because they clear up grading ambiguity, make grading easier, and provide a pathway to success.

For more on the Blackboard Rubric tool, check out the Blackboard Help pages.

Where to Start – Example Rubrics

Use Smart Views to corral unruly group assignments in the Blackboard Grade Center.

Leveraging course groups, as part of a course plan is one of the most important things an online instructor can do to encourage student engagement in an online course.

Course GroupsBenefits of course groups include:

  • Ready-made collaboration activities
  • Activities are usually recorded (discussions, blogs, wikis)
  • Critical thinking encouraged with peer review of group work
  • Students become content creators

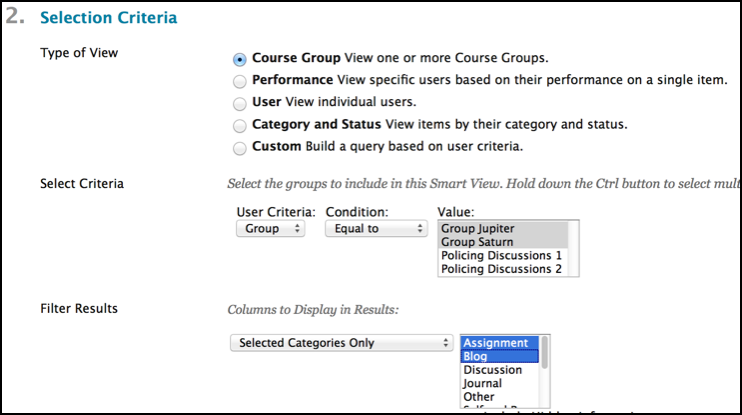
While group activities are beneficial to students, they can create extra work for you when it comes to grading.  Thankfully, Blackboard has a handy tool in the grade center to cut down on the multiple columns you have to sort through when trying to grade group work.  To manage the amount of columns and list only the groups or a specific group, just employ a Smart View.

A Smart View is a focused look at the Grade Center. It shows only the columns that match a set of criteria, and the view is saved for continued use. When the Grade Center includes a great number of students and columns, you can use smart views to quickly find data.

Several smart views are available by default, but you can also create your own. You can easily move between the Full Grade Center view and any of the available smart views. You can set a smart view as the default view of the Grade Center and change it at any time.

Smart View Selection CriteriaWith smart views, you can view the progress of the following:

  • An existing group
  • Student performance for a particular item
  • Individual students
  • Category and status of items
  • Custom combination of attributes

The Smart View list can be accessed via the manage button in the grade center.   The Smart Views can be added to the Favorites that already show up in the grade center menu of your control panel (includes assignments, tests by default).  They can also be created from this page.

*Note:  You will need to create course groups before you can create a group-based Smart View.

The Smart Views will let you focus on exactly what you want and nothing you don’t.  Be careful though, once you start using Blackboard’s Smart Views in the grade center for groups, you’ll find yourself using them on other things like tracking low scores for students who need help or to compare two different types of assessments for starters.

#bestpracticemonday – How to Choose Technology-Based Tools for an Online Course

Teaching online can seem like wading through a super store of technological innovation when it comes to the amount of technological aids available. There are a bevy of tools that can brought to bear when enhancing and equipping student learning.  The challenge comes in deciding which of these tools to use when putting together a course plan.  It is very easy to be mesmerized by the shiny object with all the bells and whistles when browing through available tech tools. The instructor is immediately assailed with questions.  Which tool works best? Which tool will the students like?  Is it too new?  Is it too old?

Making ChoicesWhen picking technologies to use in an online course, keep these four things in mind:

  1. Learning Objectives
  2. Know The Audience
  3. Logistical Considerations
  4. Instructor Comfort Level

Learning Objectives

Learning ObjectivesOnline instructors seem to have more options than ever when it comes to technology choices for their courses.  Personal Learning Networks (PLNs) are inundated by technology products that claim to work with big ideas and catchy concepts like gamification of learning and the ability to disrupt the status quo.  The pressure of keeping up with the Dr. Joneses alone can make a teacher’s technology tool belt feel more like a burden than an aid.

It is during this maelstrom of keywords and catchphrases that it is important to ask if the chosen tool will assist in completing learning objectives.  Hold firm to the mantra that it’s the method, not the medium. If the tool assists in completing learning objectives, then it is the right tool for the job.

Know The Audience

Know the AudienceWalking into a situation already knowing how the audience will react is a tremendous benefit for anyone and even more so for an online instructor.  Knowing the student audience in an online course greatly influences the technology choices that are made.

Knowing the audience isn’t some innate psychic power that online instructors are born with.  Some of this knowledge comes from past teaching experience and some comes from working through activities as a course progresses.  One of the best ways to know the audience of an online course is to take a technology literacy survey early on in the course.  This helps to establish a basic comfort level for participants and helps the instructor know which tools fill a learning need without raising anxiety levels.

Logistical Considerations

Logistical ConsiderationsChoosing the right technology can be seriously impacted by logistical considerations.  These considerations can be student-centric like a lack of high-speed Internet or a total lack of technology all together at certain periods of time.  Military service members in particular may have stretches of time where they do not have access to high-def technology, so scheduling a web conference may not be a good idea.

There is another side of logistics that must also be thought about.  The support structure for online instructors is a huge logistical consideration when choosing technology.    If a technology in use by instructors and students stops working during the course of a term, who is responsible for fixing it?  If students need help getting the technology to work, is there a support number, web or e-mail address that they can use? Do the online instructor and students have access to a help desk?  Do the help desk hours coincide with times that the technology will be used? All of these logistical considerations need to be taken into account when picking technology to use in an online course.

Instructor Comfort Level

This last part was almost not included in that it should be an understood value when it comes to tech tool selection.  The online instructor needs to be comfortable with the technology tools they choose.  It does the online students no good if the instructor’s anxiety level is up.  Students take their behavioral queues from the teacher.  If the instructor seems like they have a firm grasp of the technology and can calmly relate appropriate usage, then the student will feel the same way.  Conversely, if the instructor is flustered and communicates stress when trying to use the tool, the students will reflect that stress and frustration right back.

Comfort with technology is gained by practice.  Before introducing a tool to students, the online instructor should work with the tool on and off line to ensure that it works and that he or she is familiar with all of the technological “bumps in the road” that may arise.   Where possible the instructor should use the tool in a current class where the students can passively view the results before trying it themselves.  For example, he or she can use a presentation software like Prezi for lecture materials BEFORE asking the students to create a presentation of their own.

Choosing Technology

These 4 items can be of assistance when deciding which technologies to use. Working through them will save time and frustration before the online course begins.

Remember, the technologies out there might seem like the greatest thing since sliced bread, but if they don’t help meet learning objectives, if the audience isn’t taken into account, if logistical considerations aren’t thought about and if the instructor isn’t comfortable with the technologies then they are much like the bard wrote, “full of sound and fury and signifying nothing”.

Looking for a 1st week of class activity? Introduce your students to Blackboard’s Social Learning tools.

One of the most important things your students can do while they pursue their education is to begin to build their PLN or Personal/Professional Learning Network.

A personal learning network is an informal learning network that consists of the people a learner interacts with and derives knowledge from in a personal learning environment. In a PLN, a person makes a connection with another person with the specific intent that some type of learning will occur because of that connection.

Linked-in, Twitter feeds, professional user groups, blogs and connections your students make to colleagues are all examples of ways students can extend their PLN.  Blackboard now offers a way students can begin this experience with the new Social Learning Tools.

With Blackboard’s social learning tools you can:

  • Have an enhanced Profile where you create your online academic identity and share only what you want to share. Profiles include a profile wall for communication and the ability to message and follow other users to make connections and build your learning network.
  • Use the People tool to find your students and peers, at your school or at another school with Blackboard Learn, and build your global learning network.
  • Message anyone within the global learning network.
  • Create a collaboration Space that you control, where you can communicate with others for departmental collaboration, best practice sharing, committee work, or to foster social learning among your students. You can also participate in spaces created by your peers or students.

Why the First Week?

  • Familiarizes the student with the My Blackboard menu which gives them access to their social profile as well as the dashboard for what’s going on in all of their courses.
  • Provides a way for student to identify themselves via photo and professional, educational and social information.  Once student has uploaded a photo, every interaction they make in your course will display their photo along side it so you and fellow students can connect with each other.
  • Let’s the students know that you are interested in them as more than just a person taking a class, which can start their learning journey out on the right foot.
  • Greases the wheels of communication:  Prompts the students to start collaborating/interacting from the start.

You can find instructions for using these tools in the Teaching Online tab in Blackboard and your students can find instructions through the Getting Started tab.  Both sets of instructions are accessed by using the Get Connected link in their respective course’s navigation menu.  You can also find instructions on the web here at help.blackboard.com.

Blog at WordPress.com.

Up ↑